
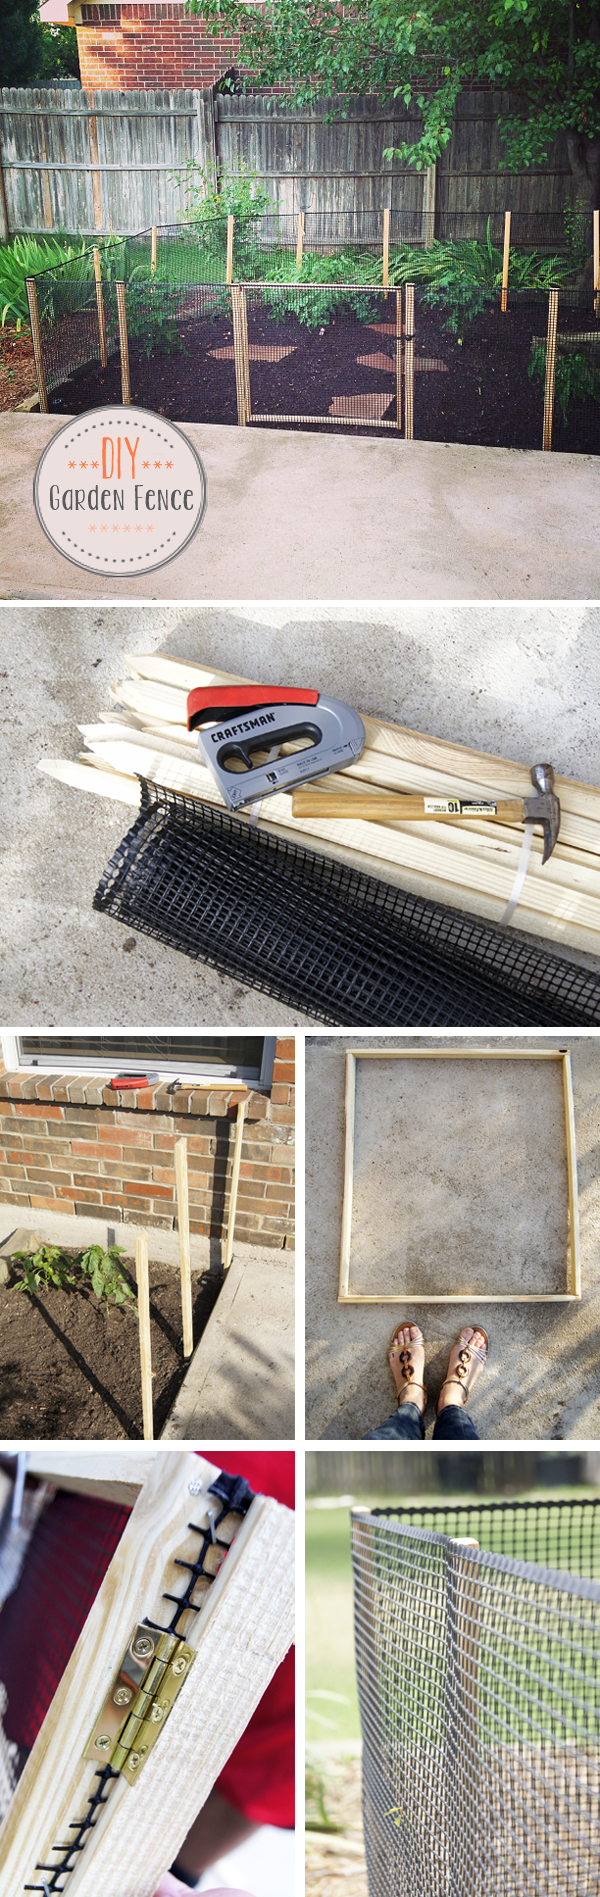
DIY // How to make a Garden Fence
Today on Oh Everything Handmade’s blog I’ll show you “How to make a Garden Fence”. For the past month or so I have been growing some garden tomatoes (successfully).
However, after I put some belt pepper seedlings into the ground, I had to find out that our wild rabbit likes the leaves… not good at all! That’s why I haven’t planted my other veggies yet, the fear of Mr. rabbit eating everything before it can even grow was too high!
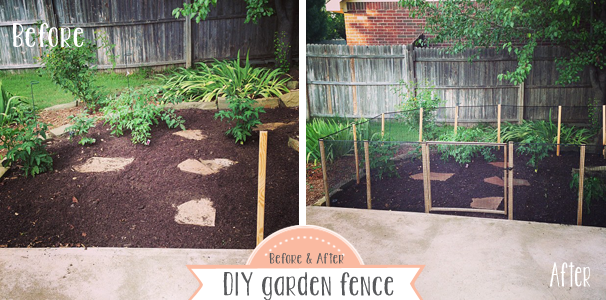
And that’s where we decided to put up a small garden fence. Now, we didn’t have that many options for the area I have as a garden. My garden has a curve on the left-hand side, which meant that I had to make my own fence.
I took a trip to Lowes and got all this…
DIY // How to make a Garden Fence
What you’ll need for a 10 x 8ft space:
- 2 rolls of 36″ x 15ft black plastic net – ($16.44 each)
- 1 pack of 24 Wood sticks 36″ tall (I found them where the lumber was) – ($11.97)
- 2 hinges (Gate House 50x25mm) – ($2.40)
- 8 screws 1 – 1 1/2″ long
- 1 small door lock (we used a tie for now)
- 1 Staple gun (we already had one)
- 1 Leveler (we already had one)
- 1 Hammer (we already had one)
Instructions:
1. Start by placing a wooden stick on the outside or corner of your garden. My garden is attached to the outside wall of our house, I started there (place the first piece of wood stick as close as you can to your house exterior).
2. Hammer the wooden stick into the ground about 6″-8″ inches deep, you can mark them prior to this step (that’s what we did). But because the ground was sloping on some spots, we had to adjust by hammering the sticks in more or less. So we used a long leveler to keep everything nice and straight.
3. For the next wooden piece, measure 1 1/2 ft in between each stick, this will keep your net tight.
4. If you like to add a door, to your garden area. Make sure to leave some room for it! After the third piece of wood, we added our door…
Read on how to make the fence door at the bottom.
5. Place your door into to ground and continue with placing the remaining wooden sticks into the ground.
6. Once all sticks are in place start by stapling the black net to each wooden piece. You should have someone who can give you a hand for this step. One that stretches the net and one that staples it on, use a hammer to secure the staples!
And that’s it, you are done!
How to make a Garden Fence – Door:
1. Cut or buy 2 pieces of wood 24″ x 1″ inches long and 2 pieces of 30″ x 1″ inches. I used the remaining wood pieces from our wooden pack and hubby just cut them to the length we needed 2 x 24″ pieces and 2 x 30″ pieces.
2. Nail each piece of wood together with screws and staple the black net onto the outside.
3. Attach 2 hinges on each end leaving about 1 – 1 1/2″ inches from the end
4. Screw the other half of your hinges onto a wooden stick, so all you have to do is place the wooden stick into the ground leaving enough room to close and open the door.
This fence is simple, but that’s what we wanted. Something that keeps the rabbit and our dogs out, Hope you enjoyed this tutorial and start one of your own. I’ll be delighted if you share yours.
Happy gardening!
You might also like:
[go_portfolio id=”related-post-home-improvement”]

Wonderful post! The great photos really help show the process as well. Hoping to start building one of my own soon once the weather allows. Thanks for the tips!
You are welcome Jessica, glad you stopped by. And I hope the weather starts allowing to build and garden outside soon.
Do you find the rabbits tearing holes into the plastic fencing?
No, we didn’t have any issues after putting up the fence.
A year ago I made a garden fence using green plastic mesh fencing. This winter, the rabbits *ate* my plastic mesh. Didn’t snip holes in it, which would have left plastic shards. No, they *ate* holes in it. They (or just one bunny with a taste for polypropylene?) had access to the same smorgasbord that we put out for the birds… the rabbits weren’t starving. In fact, those that inhabit our yard are massive. So today, I’m replacing our plastic fencing with metal.
Hope the enforced fence will last.
Hi,
If the fencing is 36 inches long and so are the posts and you shove the posts 5-6 inches into the ground, how do you get the fence to stay on evenly? Did you cut it?
No, we didn’t have to cut it. We just hammered it until they where leveled. we used a leveler and placed one end on the previous post (hope that makes sense to you?)
I think the above person has the same question as me. Did you have to cut the netting, since the netting was 36″? The buried wood posts must be only about 30″ high since they are hammered into the ground. Probably burying some of the extra netting would be a good idea, so that critters cannot burrow under the fence…
Carissa, yes that’s defiantly an option. I didn’t bury the netting, if I remember correctly we cut the netting to fit.
So did this last through the season? I’m concerned about little critters eating through the plastic netting. That looks like a much easier version of what I attempted last year.
It did Amy, but because of some strong winds we had to replace some of the wood.
I like this basic idea, but I ended up framing in the fence sections. It looks a little more presentable to me, although I’m impressed with how good your version looks as it sits. One advantage to doing it the way I did is that I was able to bury the fencing to prevent rabbits from digging underneath and getting into the garden area.
http://did-it-myself.com/simple-4-garden-fence/
It looks fantastic, especially because you captured every step you took to make the fence. Great work!
Great post, really inspiring, looking forward to start my own as well, what type of material you would suggest as a replacement for plastic net, because , i am planning a long term project.
I plan on building a version of this this weekend. Super excited. Are the posts strong enough to support metal mesh/hardware cloth? I’m worried about critters chewing through the plastic.
Yes, I would suggest metal mesh as well.
Beautiful! I’ve bought the material to make something similar, with 1″x1″ sticks and some chicken wire. (We had a mama groundhog have a litter of pups under our shed, and while they’re cute as anything, they have begun to treat my herb garden like their personal salad bar. So, an emergency fence was in order).
I have a question though, your sticks look whittled down to points so they can be shoved into the ground. Did you do that yourself? If so did you use any tools? I tried whittling by hand but it takes way too long and seems very impractical for how many posts I’m going to need.
We bought them pointed at home depot in the garden section. Yes, groundhogs are not something you would want in your garden, they will gobble up all the yummies.
I did the same thing only instead of wood and staples I used the 36″ plastic coated metal plant stakes and zipties. I got the stakes on Amazon 25 for under $30
Thanx for you suggestion to use the plastic metal stakes and zipties. I need to construct something to keep deer away and this sounds like a great alternative to wooden stakes!
How did you get a door toe work with this method?
This is perfect and just what I was looking for – it is inexpensive, simple and is removeable (like at the end of the season) and it will work for a rounded shape. Great job with the instructions! Love the gate option.
The step-by-step instructions, accompanied by clear images, make the entire process seem achievable, even for someone like me who may not have extensive DIY experience. Greetings from Germany!
Loved this, just what I was looking for. I wanted to see more photos of the fence door process as I couldn’t visualize from the instructions alone and this my first time building anything!
Nancy M