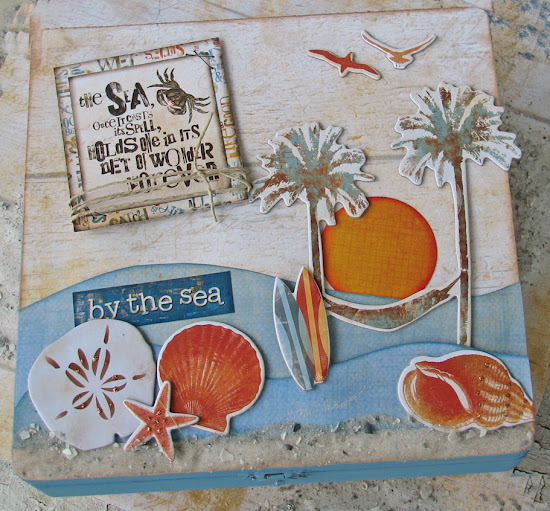
Wooden Sea theme Keepsake box – DIY
I came across this cute box at Bits of me… the craft mom and had to share this cute DIY.
Let’s get started…
Here is what you need:
Bo Bunny Paradise and also available at Scrapbook.com and ACherryontop.com.
Glue Arts 3D Combo Pack Adhesive
Glue Arts Glue Glider Pro Adhesive
Wood Craft Box (Michael’s)
Paint
Colorbox Chalk Inks
Large Circle Punch
Wood Beads
Hot Glue Gun
Mod Podge
Twine/raffia
Stickles Glitter
Sand (yes…the real stuff!)
1) Paint the sides and top edge of box. This doesn’t need to be perfect. I went for the beachy, painted, weathered look. So I wasn’t too concerned if it wasn’t fully covered and coated. It looked better if it was a bit imperfect. (hard for me to do!lol)
2) Once the paint is dry….turn box over and trace top onto backside of paper. Trace and cut out. Ink edges and set aside.
3) I knew I wanted it to look like there was an ocean on the design so I just hand drew a wavy shape and then cut out two layers. Ink the edges and glue onto background paper.
4) Punch out circle and ink edges. Set aside. Select chipboard shell shapes. Use Stickles glitter to add glittery accents to shells. Allow to dry.
5) Cut out the “sea” quote from die cut sheet. Wrap twine or raffia around quote. Use 3D adhesive and ahere to background paper.
6) Now add various chipboard shapes to the background paper. Leave a 1/4 inch space on the bottom for the sand border.
7) Adhere the background paper with elements onto the wood box.
8) Using paint brush or finger add a line of Mod Podge adhesive to bottom of paper. Generously sprinkle sand onto adhesive. Allow time to dry and then shake off excess sand.
9) Hot glue wood beads onto the bottom on the box.
Consider decorating the inside of the box as well! Add photos, brochures, tickets and more to remember a special trip!

