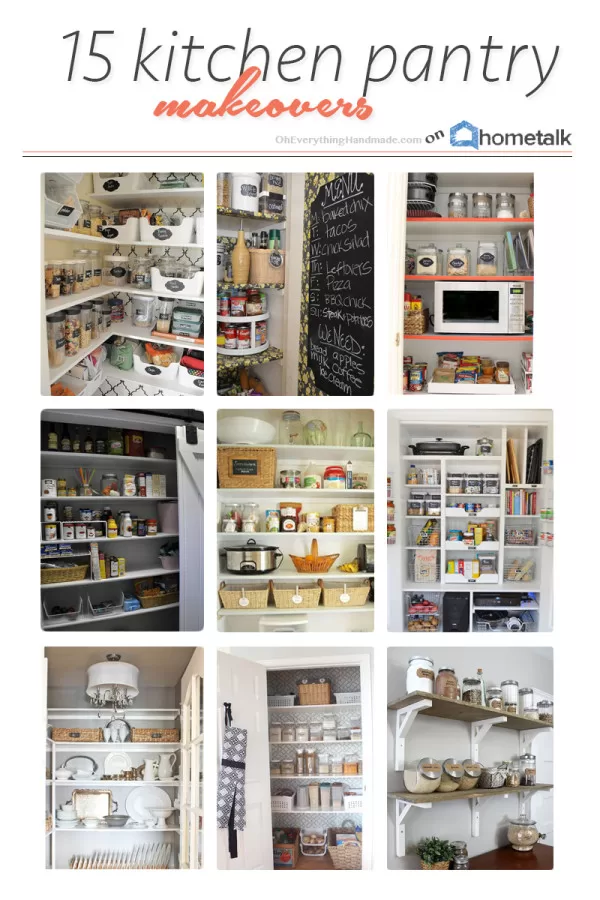
DIY // Necklace and bracelet
This week I like to introduce my new series “Made by color DIY“ – each episode will be posted each Friday for the next few weeks, so stay tune and sign up for the newsletter in order to get this series first hand.
Each Friday I’ll post color coordinated beads, which will be use to make new designs or custom orders. So let’s get started, with our first Episode .1.01 – Color Turquoise, Blue, Teal


Spending time on creating new jewelry designs, is one of my favorite things to do. So for this Episode I created a Jewelry piece for one of my friends here on the island. She is currently 7 Month pregnant and has a maternity shooting coming up at the end of this month with Perfect Expressions Photography.
I went with a beachy color – blue AB crystal (15mm in size) – this crystal will reflect all those beautiful colors from the water we have here, and will tie in perfectly with the background. To give this necklace a softer look, I used a cream brown ribbon, which is knotted in between each crystal.
Are you getting just as excited about this DIY? Ok, let’s get started!
 You’ll need:

- 5x Beads (Chinese Crystal (AB Finished) Faceted Round (Aqua), 15mm) with a 2-3mm hole (or it won’t work)
- 24″ inches of Offray 15mm Ribbon (Michaels.com)
- 1 Bead Reamer (Tools at beadalon.com)- not shown in picture!
- Lighter
 Most 15mm beads will come with a bigger hold, but if you are not sure read the description of the bead before ordering. The proper size for the Bead hole should be between 2-3mm. This is important because you need to fit the ribbon through it.
 Cut the Ribbon in an angle to where it will be very pointy at the top, so you have it easier to enter the Bead hole.
 On this next step you need to melt the ends with a lighter (be careful;hold the lighter not to close or your ribbon will curl), the ribbon will fit through the bead easier and fuss free. If you still struggle – use the Bead reamer to push your ribbon through. Slide the first bead to the middle of your Ribbon.
 Knot each end as shown above, add 2 more beads on each side with knots in between.

 When you have added all 5 beads to your ribbon, make sure to cut the ends one more time in a 45° angle, and melt them so your necklace stays nice for a long time. Now, this last step is very important, you NEED to iron your ribbon on the lowest heat or silk setting. Due to the pulling and squishing of your ribbon throughout this DIY project, it will look quite wrinkled – the ironing gives it the finishing touch!
 I made a fitting bracelet to go with the necklace, which I personally fell in love with. Looks like I will have to make one for myself!!!
If you enjoyed this DIY, please leave me your comment. Let me know what you think about this cute Ribbon Crystal Necklace and Bracelet set? Or simply share it with your friends -Enjoy Betty